


This post contains the steps to build your first IBM Event Streams Kafka Connect MQ Source Connector image.
Examples are listed where you need to add the dependencies. This was the first image I built. However, the final image is built using the latest MQ source connector jar file which contains all the dependencies.
I faced multiple problems:
- I originally built the image using the “kafka-connect-mq-source-2.0.0” MQ source connector. At this time, I didn’t realize that there are dependencies, and that the dependencies were missing from the jar file.
- After I managed to identify the dependencies and work out where to download them from (maven), I put them all in the my-plugins directory rather than a subdirectory.
Both of these issues caused a ClassNotFoundException. Refer here for more details.
Estimated reading time: 11 minutes
Sample files
This post refers to 4 GitHub links:
- A valid working structure containing all the dependencies.
- A structure missing the dependencies.
- A structure containing the dependencies, but the file structure is invalid.
- The kafka-connect-mq-source-2.3.0 files I used in this post to create the final image.
My environment
For this post, I used a RHEL UNIX server to build the Kafka Connect image.
Log into the UNIX server and create the following directories.
mkdir ~/kafka
mkdir ~/kafka/kafka-connect-mq-source-2.0.0-missing-dependencies
mkdir ~/kafka/kafka-connect-mq-source-2.0.0-invalid-structure
mkdir ~/kafka/kafka-connect-mq-source-2.0.0
mkdir ~/kafka/mq-source-connector-2.3.0The different directories can be used to test the different attempts listed below.
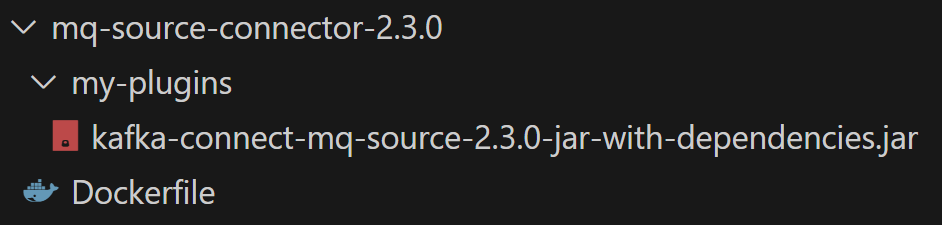
For the final image, this post only uses the mq-source-connector-2.3.0 directory. This is the latest MQ source connector available at the time of writing this post. It contains all the required dependencies.
You can download the mq-source-connector-2.3.0 files from here. This contains the Dockerfile, plus the MQ source connector jar file in the correct directory structure.
For your enterprise, be sure to download the MQ source connector from the official IBM download page.
FTP the downloaded files to “~/kafka/mq-source-connector-2.3.0”.
Ensure the directory structure is as follows.
Prerequisites
The following lists the prerequisites for the case where you need to manually include the dependencies.
IBM Event Streams image
If you check the Dockerfile you’ll see the first prerequisite is the IBM Event Streams image itself. In the below image, the base image is “ibm-eventstreams-kafka:11.3.1”.
FROM cp.icr.io/cp/ibm-eventstreams-kafka:11.3.1
COPY ./my-plugins/ /opt/kafka/plugins/
USER 1001To be able to access the base image, you’ll need an entitlement to be able to download this image from icr.io. This entitlement key can be generated and downloaded from Passport Advantage.
Source connector jar file
This post builds an IBM MQ source connector.
If you want to test the attempts I list below, use the source connector jar file kafka-connect-mq-source-2.0.0.jar.
To test with a jar file containing all the dependencies, download a later version of the jar file kafka-connect-mq-source-2.3.0.jar (this starts a download of the jar file).
Dependency jar files
For this post, the dependency jar files can be found at a slightly older IBM Event Streams online doc.
By default, IBM MQ source connector v2 does not package any external dependencies. Follow the instructions in setting up connectors to add your dependencies.
Add the following dependencies to the IBM MQ source connector v2.
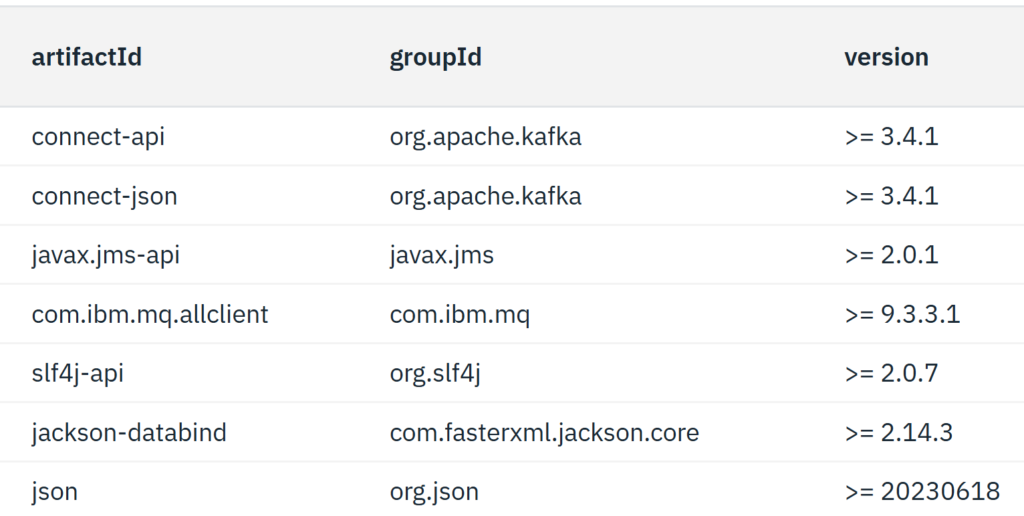
You can download the dependencies from Maven Central.
The following table provides convenient URLs to download the jar files.
| artifactId | groupId | version | Maven Central |
| connect-api | org.apache.kafka | >= 3.4.1 | Download URL |
| connect-json | org.apache.kafka | >= 3.4.1 | Download URL |
| javax.jms-api | javax.jms | >= 2.0.1 | Download URL |
| com.ibm.mq.allclient | com.ibm.mq | >= 9.3.3.1 | Download URL |
| slf4j-api | org.slf4j | >= 2.0.7 | Download URL |
| jackson-databind | com.fasterxml.jackson.core | >= 2.14.3 | Download URL |
| json | org.json | >= 20230618 | Download URL |
Notes
- The jar files must be placed in the directory “my-plugins”.
- If there is more than one jar file, they must be placed in a sub-directory (my-plugins/mq-source). If this is not followed you will get a ClassNotFoundException error in the running pod logs.
Copy the files to your build server
The remainder of the post assumes your build server is on UNIX. Make the necessary adjustments if you are using Windows.
This section shows 3 structures I managed to try with. The first two produced errors, while the third one worked fine,
Attempt 1 – Missing dependencies
For my first attempt, I built the Kafka Connect image successfully but when I started my Kafka connector, I got a ClassNotFoundException.
To simulate this, you can download the files and structure from here.

The above connector does not contain the dependency files.
Attempt 2 – Added dependencies, but in the wrong location
With my second attempt, I added the dependencies to the my-plugins directory and built the image. I still got the ClassNotFoundException.
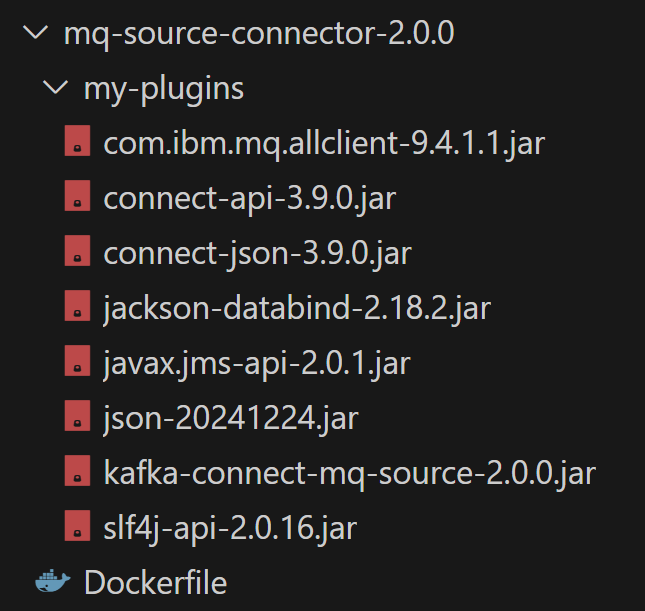
In the above image, all the required jar files are available. However, they were all placed in the my-plugins directory. When multiple jars are present, they need to be placed in a subdirectory. This is documented in the online IBM documentation, but as I so often do, I failed to fully read the doc.
To simulate this, you can download the files and structure from here.
Attempt 3 – Success!!
The below shows all the dependencies in the correct directory structure.

A you can see, the subdirectory named “mq-source” contains all the jar files.
To simulate this, you can download the files and structure from here.
Do you use a proxy
Complete the following if your organization requires you to use a proxy to access icr.io.
Create a proxy for accessing icr.io
To create a proxy to access icr.io.
export https_proxy=http://YOUR_PROXY_IP:YOUR_PROXY_PORTUse curl to verify the proxy is working fine.
curl -vkL https://icr.ioDon’t use a proxy for any local DNS names
You may need to use no proxy for internal DNS entries.
export no_proxy =*.YOUR_INTERNAL_DOMAINFor example,
export no_proxy =*.intra.thechalkboards.comAdd any other values as required.
Build the Kafka Connect image
Let’s build the image.
Entitlement key
Log into Passport Advantage.
Copy your entitlement key. You’ll need to use this as the password when logging into icr.io using podman.
Log into icr.io
Use the podman login command to log into icr.io.
podman login cp.icr.io -u cpThe user id you use is “cp” (for CloudPak).
When prompted for the password, enter your entitlement key obtained from Passport Advantage.
Optionally download the IBM Event Streams image
Depending on your download speed, or the reliability of your internet connection, you may want to download the image to your local registry.
To pull the Kafka Connect base image from icr.io, complete the following.
Pull the image
Download the image using the podman pull command. In the below example, IBM Event Streams 11.3.1 will be downloaded.
podman pull cp.icr.io/cp/ibm-eventstreams-kafka:11.3.1[sean@localhost mq-source-connector-2.3.0]$ podman pull cp.icr.io/cp/
Trying to pull cp.icr.io/cp/ibm-eventstreams-kafka:11.3.1 ...
Getting image source signatures
Checking if image destination supports signatures
Copying blob c5ed510e3f00 done
Copying blob b5f0ae019740 done
Copying blob a30c8bb182b7 done
Copying blob 87e3ab05d9a4 done
Copying blob 5dleefd4adc8 done
Copying blob 568cfaa2f1e4 done
Copying blob 51b49adce7ee done
Copying blob dbfba1dea675 done
Copying blob 5d4a209019a7 done
Copying blob 63685cf8ba64 done
Copying blob 7022e4e1f965 done
Copying blob 66203e562c99 done
Copying blob b28982c336a2 done
Copying blob 63fba9c15bfd done
Copying blob f1b9f9563a3d done
Copying blob b7085636c136 done
Copying blob 0f832ee0f5fc done
Copying blob 4f1f39eddab9 done
Copying blob 57c4753dea18 done
Copying blob 2ee4adc857db done
Copying blob 3ad0f1dcaea8 done
Copying blob f7cda79486cc done
Copying blob d91894c34701 done
Copying blob 4f4fb700ef54 done
Copying blob e0f652f440d6 done
Copying config 8f26f3b4c2 done
Writing manifest to image destination
Storing signatures
8f26f3b4c2b331d794e6bf14339d6ce369754c510c94a2890384e1bee0430ef4
Verify the downloaded image
Issue the following command to check the image has been downloaded.
podman images[sean@localhost mq-source-connector-2.3.0]$ podman images
REPOSITORY TAG IMAGE ID CREATED SIZE
cp.icr.io/cp/ibm-eventstreams-kafka 11.3.1 8f26f3b4c2b3 12 months ago 748 MBBuild the image
Build the Kafka Connect MQ Source Connector image.
Confirm all files available
Re-confirm you have access to all the required files and have changed into the correct directory.
cd ~/kafka/mq-source-connector-2.3.0
ls -lRAt the start of the post, you should have FTP’d the required files to the UNIX server.
[sean@localhost mq-source-connector-2.3.0]$ cd ~/kafka/mq-source-connector-2.3.0
[sean@localhost mq-source-connector-2.3.0]$ ls -lR
.:
total 4
-rw-r--r--. 1 sean sean 98 Apr  4 23:40 Dockerfile
drwxr-xr-x. 2 sean sean 69 Apr 11 22:10 my-plugins

./my-plugins:
total 17540
-rw-r--r--. 1 sean sean 17960269 Apr 4 23:41 kafka-connect-mq-source-2.3.0-jar-with-dependencies.jarPodman build command
Issue the podman build command.
podman build -t kc-mq-source-2.3.0:1.0 -f Dockerfile[sean@localhost mq-source-connector-2.3.0]$ podman build -t kc-mq-source-2.3.0:1.0 -f Dockerfile
STEP 1: FROM cp.icr.io/cp/ibm-eventstreams-kafka:11.3.1
STEP 2: COPY ./my-plugins/ /opt/kafka/plugins/
0f54e463fd58118d5afc1c2d3f00970677482042f4d896b45d382e4dc3994208
STEP 3: USER 1001
STEP 4: COMMIT kc-mq-source-2.3.0:1.0
036dd7cbb58b014ee7dd3eb0ac6e1b12d682b4d7d7164459280a0cd6c0822aad
036dd7cbb58b014ee7dd3eb0ac6e1b12d682b4d7d7164459280a0cd6c0822aadVerify the image
Verify the image has been bult and tagged correctly.
podman images[sean@localhost mq-source-connector-2.3.0]$ podman images
REPOSITORY TAG IMAGE ID CREATED SIZE
localhost/kc-mq-source-2.3.0 1.0 036dd7cbb58b 20 hours ago 766 MB
cp.icr.io/cp/ibm-eventstreams-kafka 11.3.1 8f26f3b4c2b3 12 months ago 748 MBPush the image to your registry
The final step is to push the image to your registry.
While this post uses the OpenShift registry, your company may host its’ own registry. Adjust the below commands for your company registry.
Log into OpenShift
Log into OpenShift.
oc login -u sean --server=https://api.OPENSHIFT_DNS_NAME:6443Select your project.
oc project YOUR_PROJECT_NAMEIdentify the OpenShift registry info
Issue the following command to obtain the OpenShift registry details. If you are using another company registry, obtain the details from the OpenShift team.
oc registry info[sean@localhost mq-source-connector-2.3.0]$ oc registry info
registry.apps.OPENSHIFT_DNS_NAMETag the image to your registry
Tag the image to your registry. The below command uses the OpenShift internal registry.
podman tag localhost/kc-mq-source-2.3.0:1.0 registry.apps.OPENSHIFT_DNS_NAME/kc-mq-source-2.3.0:1.0[sean@localhost mq-source-connector-2.3.0]$ podman images
REPOSITORY TAG IMAGE ID CREATED SIZE
localhost/kc-mq-source-2.3.0 1.0 036dd7cbb58b 20 hours ago 766 MB
registry.apps.OPENSHIFT_DNS_NAME/kc-mq-source-2.3.0 1.0 036dd7cbb58b 20 hours ago 766 MB
cp.icr.io/cp/ibm-eventstreams-kafka 11.3.1 8f26f3b4c2b3 12 months ago 748 MBLog into your registry
Log into your registry. In this post, log into the OpenShift registry.
podman login registry.apps.OPENSHIFT_DNS_NAME -u $(oc whoami) -p $(oc whoami -t)[sean@localhost mq-source-connector-2.3.0]$ podman login registry.apps.OPENSHIFT_DNS_NAME -u $(oc whoami) -p $(oc whoami -t)
Login Succeeded!Push the image to your registry
Push the image to your registry. Be sure to use the image you tagged with the registry name and not the localhost tagged image.
podman push registry.apps.OPENSHIFT_DNS_NAME/kc-mq-source-2.3.0:1.0[sean@localhost mq-source-connector-2.3.0]$ podman push registry.apps.OPENSHIFT_DNS_NAME/kc-mq-source-2.3.0:1.0
Getting image source signatures
Copying blob 72a724114ed4 done
Copying blob ff3fb403edba done
Copying blob 4c19a50ea685 done
Copying blob c1f8ab7c6087 done
Copying blob 0cc0ca90d790 done
Copying blob 2e0517cb6931 done
Copying blob d4c62ebc480d done
Copying blob eda9c31bea4f done
Copying blob ffd028191914 done
Copying blob d5ef7c5602de done
Copying blob c8a7b02e9de8 done
Copying blob 6f769842f351 done
Copying blob 8bc6e7b1b985 done
Copying blob f9e73787b619 done
Copying blob a34926af6991 done
Copying blob ea887e79c9dc done
Copying blob 968f59bd8392 done
Copying blob 4d79062a276b done
Copying blob cc159c3a07d1 done
Copying blob 5f70bf18a086 skipped: already exists
Copying blob f7fd1837a9f1 done
Copying blob 3c2e77af2df5 done
Copying blob 1769a7c1b0da done
Copying blob a45e375ed18a done
Copying blob 90fe0d32d5d4 done
Copying blob f3ea4676ed46 done
Copying config 9475260a13 done
Writing manifest to image destination
Storing signaturesLast updated: 11 April 2025
Leave a Reply